1. 구성 환경
Source
- OS : CentOS 7.9
- DB : EDB 16
- SharePlex : 11.3.0(EDB는 11.3.0버전 부터 지원함)
Target
- OS : CentOS 7.9
- DB : EDB 16
- SharePlex : 11.3.0 (EDB는 11.3.0버전 부터 지원함)
소스/타겟에 EDB 설치는 아래 링크 참조
https://developersj.tistory.com/186
[CentOS 7.9] EDB 16 설치
OS 환경 : CentOS 7.9 DB 환경 : EDB 16 1. 셸 스크립트 다운로드 # curl -1sLf 'https://downloads.enterprisedb.com/wi3ItJeo3GdTmOetweJRGV1suTD4qOPl/enterprise/setup.rpm.sh' | sudo -E bash 2. 패키지 설치 # yum -y install edb-as16-server 3. 자
developersj.tistory.com
2. 사전 작업
2-1. ODBC 설치(Source/Target)
셸 스크립트 다운로드
# curl -1sLf 'https://downloads.enterprisedb.com/wi3ItJeo3GdTmOetweJRGV1suTD4qOPl/enterprise/setup.rpm.sh' | sudo -E bash패키지 설치
# yum -y install edb-odbc
# yum -y install edb-odbc-devel
2-2. OS에서 splex 유저 생성(Source/Target)
# groupadd dba
# useradd -g dba -G dba splex
# passwd splex
2-3. 필요 디렉토리 생성(Source/Target)
# mkdir -p /splex/prod
# mkdir -p /splex/var
# cd /
# chown -R splex:dba /splex
2-4. /ect/hosts 확인
# cat /etc/hostsSource :

Target :

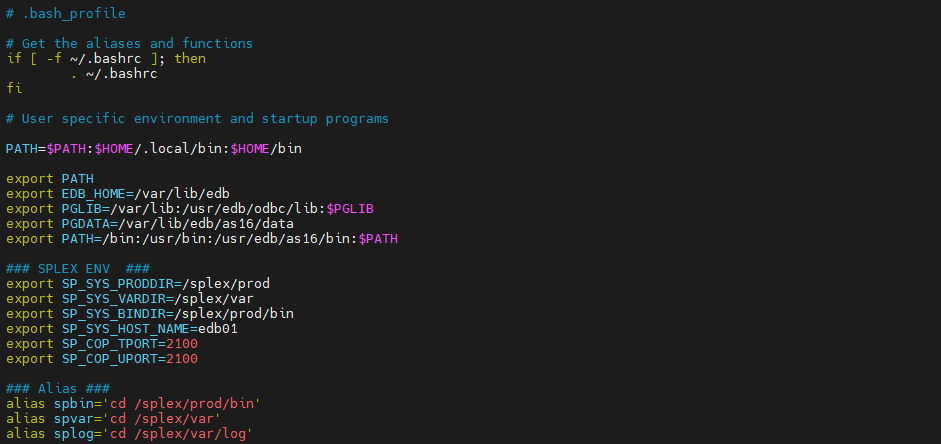
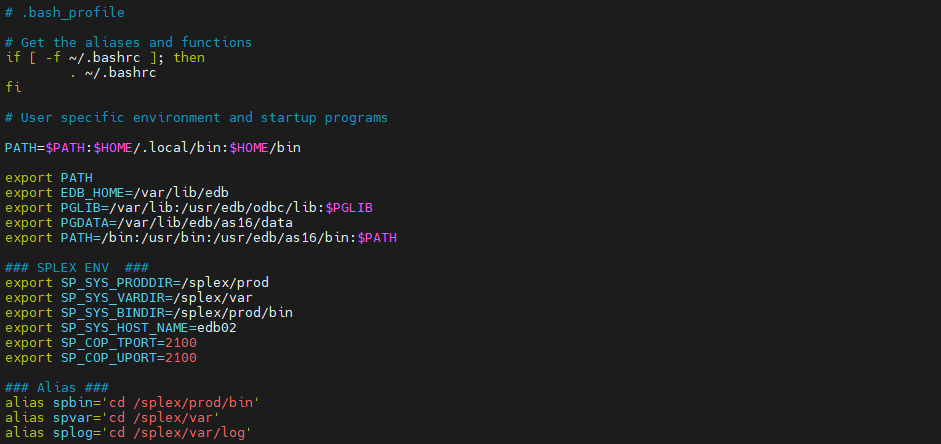
2-5. splex 유저 환경변수 설정(Source/Target에 맞게 설정)
# su - splex
# vi ~/.bash_profile
Source :

Target :

2-6. hosts 파일 수정(Source와 Target 네트워크 확인 : port 오픈, tcp 통신)
# su - root
# vi /etc/hosts
Source :

Target :

2-7. ping 확인
Source :

Target :

2-8. 포트 오픈 확인
Source :
# nc -l 2100 --> 타겟 서버에서 입력하는 텍스트를 대기함Target :
# nc 172.16.60.198 2100  --> Source 서버주소와 2100번 포트
  test --> 아무 텍스트나 입력 후 엔터 후 ctrl+c 하여 연결 종료
Source :
# test --> target에서 입력한 "test"를 확인 함.
3. SharePlex Install
3-1. SharePlex 미디어 업로드(ftp 사용하여 SharePlex 11.3.0버전 미디어 업로드)
3-2. splex 유저에게 업로드한 미디어 실행 권한 부여(Source/Target)
# su - root
# chown splex:dba /media/SharePlex-11.3.0-bl-rhel-amd64-m64.tpm
# chmod 755 /media/SharePlex-11.3.0-bl-rhel-amd64-m64.tpm
# ls -rlt
3-3. 인스톨 진행(Source/Target)
# ./SharePlex-11.3.0-b55-rhel-amd64-m64.tpmUnpacking ..................................................................
..........................................................................
..........................................................................
..........................................................................
..........................................................................
..........................................................................
..........................................................................
..........................................................................
..........................................................................
..........................................................................
..........................................................................
..........................................................................
....................................................................
SharePlex installation program:
SharePlex Version: 11.3.0
Build platform: rhel-amd64
Target platform: rh-40-amd64
Please enter the product directory location? /splex/prod
Please enter the variable data directory location? /splex/var
Please specify the SharePlex Admin group (select a number):
1. [dba]
? 1
Please enter the TCP/IP port number for SharePlex communications? [2100]
Preparing to install SharePlex v.11.3.0:
User: splex
Admin Group: dba
Product Directory: /splex/prod
Variable Data Directory: /splex/var
Proceed with installation? [yes]
Installing ................................................................
.........................................................................
.........................................................................
.........................................................................
.........................................................................
.........................................................................
.........................................................................
.........................................................................
.........................................................................
.........................................................................
.........................................................................
.........................................................................
.........................................................................
.........................................................................
.........................................................................
.........................................................................
.....
Setting file ownerships ...................................................
.........................................................................
.........................................................................
.........................................................................
.........................................................................
.........................................................................
.........................................................................
.........................................................................
.........................................................................
.........................................................................
.........................................................................
.........................................................................
.........................................................................
.........................................................................
.........................................................................
.........................................................................
..................
Setting file permissions ..................................................
.........................................................................
.........................................................................
.........................................................................
.........................................................................
.........................................................................
.........................................................................
.........................................................................
.........................................................................
.........................................................................
.........................................................................
.........................................................................
.........................................................................
.........................................................................
.........................................................................
.........................................................................
...................
Do you have a valid SharePlex v. 11.3.0 license? [yes]
Please specify the platform for license key (select a number):
1. [Oracle]
2. File
3. JMS
4. Kafka
5. SQL Server
6. Postgres
7. MySQL
8. Snowflake
9. Event Hubs
10. All Platforms
? 10
Please enter the License key? XXXXXXXXXXXXXXXXXXXXXXXXXXXXXXXXXXXXXXXXXXXXXXXXXXXXXXXXXXXXXXXXXXXXXXXXXXXXXXXXXXXXXXXXXXXXXXXXXXXXXXXXXXXXXXXXXXXX
SharePlex v. 11.3.0 license validation successful.
Following are the details of installed licenses:
Platform: All
Product Name: SharePlex
Product Version: 11
License Number: 152-882-869
License Key Type: Trial
License Expiry: Midnight of Jan 29, 2024
License Key: XXXXXXXXXXXXXXXXXXXXXXXXXXXXXXXXXXXXXXXXXXXXXXXXXXXXXXXXXXXXXXXXXXXXXXXXXXXXXXXXXXXXXXXXXXXXXXXXXXXXXXXXXXXXXXXXXXXX
NOTE: You can upgrade this license key or add license keys by executing utility
/splex/prod/install/splex_add_key.
Installation log saved to: /home/splex/.shareplex/INSTALL-SharePlex-11.3.0-2401091712.log
SharePlex v.11.3.0 installation successful.
3-4. odbcinst.ini 파일 수정(Source/Target)
# spvar
# cd odbc
# vi odbcinst.ini
3-5. odbc.ini 파일 수정(Source/Target)
# vi odbc.ini
3-6. pg_setup 실행(Source/Target)
# spbin
# ./pg_setup
Source :
Welcome to SharePlex for PostgreSQL setup.

This process creates the SharePlex tables, login and user accounts needed to run
SharePlex replication.

To create these items, we must connect to the database as an Administrator.

Enter the PostgreSQL DSN name or connection string [] : EDB

Is DB hosted over "Azure Single Server"? [n] :

NOTE: Admin User role Requirements -
        > On-Prem DB       :    superuser
        > AWS hosted DB    :    rds_superuser
        > Azure hosted DB  :    azure_pg_admin
        > GCP hosted DB    :    cloudsqlsuperuser

Enter the PostgreSQL Administrator name : enterprisedb

Enter the password for the Administrator account :

Enter the database name : hr

Would you like to create a new SharePlex user ? [y] : n

Enter the name of the existing SharePlex user : enterprisedb

Enter the password for 'enterprisedb' :


Will this database be used as a source? [n] : y

Enter the replication slot name? :

Unable to get slot name.

/splex/prod/.app-modules/pg_setup:
Exiting.

[splex@edb01 bin]$ ./pg_setup


Welcome to SharePlex for PostgreSQL setup.

This process creates the SharePlex tables, login and user accounts needed to run
SharePlex replication.

To create these items, we must connect to the database as an Administrator.

Enter the PostgreSQL DSN name or connection string [] : EDB

Is DB hosted over "Azure Single Server"? [n] :

NOTE: Admin User role Requirements -
        > On-Prem DB       :    superuser
        > AWS hosted DB    :    rds_superuser
        > Azure hosted DB  :    azure_pg_admin
        > GCP hosted DB    :    cloudsqlsuperuser

Enter the PostgreSQL Administrator name : enterprisedb

Enter the password for the Administrator account :

Enter the database name : hr

Would you like to create a new SharePlex user ? [y] : n

Enter the name of the existing SharePlex user : enterprisedb

Enter the password for 'enterprisedb' :


Will this database be used as a source? [n] : y

Enter the replication slot name? : edbslot
NOTE: Replication slot edbslot will be created in database after successful config activation.

Do you want Logical replication? [n] :
NOTE: SharePlex will perform Physical replication!

Setup will now install SharePlex objects.

These are the existing tablespaces.

pg_default

Enter the default tablespace for use by SharePlex [pg_default] :
Enter the index tablespace for use by SharePlex [pg_default] :

Creating SharePlex objects

Creating table...enterprisedb.SHAREPLEX_ACTID

Creating table...enterprisedb.SHAREPLEX_MARKER

Creating table...enterprisedb.SHAREPLEX_OBJMAP

Creating table...enterprisedb.SHAREPLEX_LOGLIST

Creating table...enterprisedb.SHAREPLEX_CONFIG

Creating table...enterprisedb.SHAREPLEX_COMMAND

Creating table...enterprisedb.SHAREPLEX_SYNC_MARKER

Creating table...enterprisedb.SHAREPLEX_CHANGE_OBJECT

Creating table...enterprisedb.SHAREPLEX_ANALYZE

Creating table...enterprisedb.SHAREPLEX_COMPARE_MARKER

Creating table..."enterprisedb"."shareplex_conf_log"

Creating Conflict Resolution File . . .
Creating Conflict Resolution Schema . . .
Done.

Completed SharePlex for PostgreSQL database configuration
SharePlex User name: enterprisedb
Database name: hr

-- The datasource identifier in the SharePlex configuration is 'r.hr' --
Target :
Welcome to SharePlex for PostgreSQL setup.

This process creates the SharePlex tables, login and user accounts needed to run
SharePlex replication.

To create these items, we must connect to the database as an Administrator.

Enter the PostgreSQL DSN name or connection string [] : EDB

Is DB hosted over "Azure Single Server"? [n] :

NOTE: Admin User role Requirements -
        > On-Prem DB       :    superuser
        > AWS hosted DB    :    rds_superuser
        > Azure hosted DB  :    azure_pg_admin
        > GCP hosted DB    :    cloudsqlsuperuser

Enter the PostgreSQL Administrator name : enterprisedb

Enter the password for the Administrator account :

Enter the database name : hr

Would you like to create a new SharePlex user ? [y] : n

Enter the name of the existing SharePlex user : enterprisedb

Enter the password for 'enterprisedb' :


Will this database be used as a source? [n] :

Creating table..."enterprisedb"."shareplex_conf_log"

Creating Conflict Resolution File . . .
Creating Conflict Resolution Schema . . .
Done.

Completed SharePlex for PostgreSQL database configuration
SharePlex User name: enterprisedb
Database name: hr

-- The datasource identifier in the SharePlex configuration is 'r.hr' --
3-7. 기동 스크립트 생성(Source/Target)
# spbin
# vi start.sh
./sp_cop -u2100 &
# chmod u+x start.sh
3-7. connection.yaml 파일 확인(Source/Target) --config 파일 작성 때 필요
# vi /splex/var/data/connections.yamlSource :

Target :

3-8. config 파일 작성(Source)
# spvar
# cd config
# vi EDB_config
소스 connections.yaml 파일에서 확인한 값을 첫 줄의 datasource: 뒤에 작성하고, 타겟 connections.yaml 파일에서 확인한 값을 routing map에 작성한다. 소스와 타겟에 미리 생성한 public 스키마의 dept 테이블을 매핑했다.
3-9. config 확인(Source)
# spbin
# ./start.sh
Source :

Target :

# ./sp_ctrl
sp_ctrl> verify config EDB_config
* Specification will be skipped --> Object may not be replicated because it's replica identity is not full 오류 발생 시

아래 명령어 실행
# su - enterprisedb
-bash-4.2$ psql hr
hr=# CREATE PUBLICATION panoply_publication FOR ALL TABLES WITH (publish = 'insert, update');
hr=# ALTER TABLE dept REPLICA IDENTITY FULL;
* config 파일 유효성 검사 성공 화면

3-10. Activate config(Source)
sp_ctrl> activate config EDB_config
3-11. Activate 확인
Source :
sp_ctrl> show config
sp_ctrl> show --> 프로세스 기동 확인(Capture, Read, Export)
Target :
sp_ctrl> show --> 프로세스 기동 확인(Import, Post)
DML 테스트 수행
Source :
# su - enterprisedb
-bash-4.2$ psql hr
hr=# INSERT INTO dept VALUES (10,'ACCOUNTING','NEW YORK');
hr=# select * from dept;
Target :
# su - enterprisedb
-bash-4.2$ psql hr
hr=# select * from dept;
'SharePlex' 카테고리의 다른 글
| [SharePlex] Parameter 정리 (0) | 2024.05.02 |
|---|---|
| [SharePlex] ORA-650, ORA-01031 (0) | 2024.05.02 |
| [SharePlex] Datapump를 활용한 초기적재 (1) | 2024.02.27 |
| [SharePlex] Oracle19c to Oracle19c (1) | 2023.12.08 |
| [SharePlex] SharePlex Migration (0) | 2023.12.07 |