1. 구성 환경
Source
- OS : Oracle Linux7
- DB : Oracle 19c Single
- SharePlex 11.0.0
Target
- OS : Oracle Linux7
- DB : Oracle 19c Single
- SharePlex 11.0.0
2. 사전 작업
2-1. OS에서 splex 유저 생성(Source/Target)
$ useradd -g dba -G dba splex
$ passwd splex
2-2. 필요 디렉토리 생성(Source/Target)
$ mkdir -p /splex/prod
$ mkdir -p /splex/var
$ cd /
$ chown -R splex:dba splex
2-3. /etc/hosts 와 /etc/hostname 확인
$ cat /etc/hostsSource :

Target :

$ cat /etc/hostnameSource :

Target :

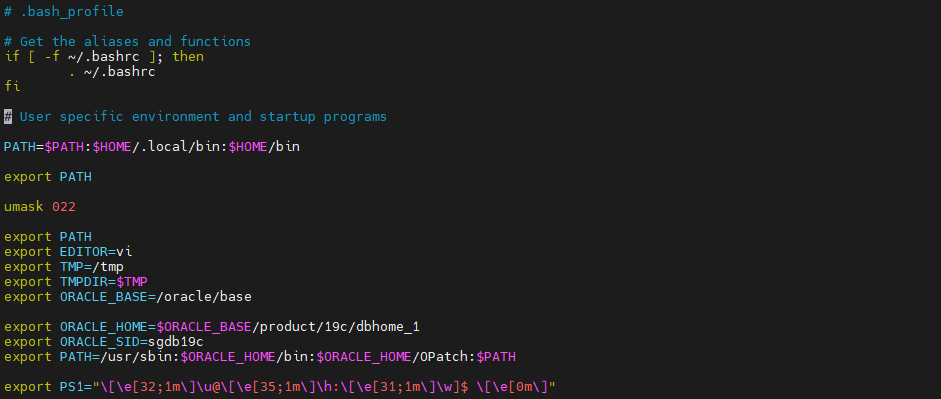
2-4. oracle 유저의 환경변수 확인(ORACLE_BASE, ORACLE_HOME, ORACLE_SID)
$ su - oracle
$ vi .bash_profile
2-5. splex 유저 환경변수 설정(Source/Target에 맞게 설정)
Source :
$ su - splex

$ vi .bash_profile
### Oracle ENV  ###
export ORACLE_HOSTNAME=source
export ORACLE_BASE=/oracle
export ORACLE_HOME=$ORACLE_BASE/19cSE/db
export ORACLE_SID=sgdb19c

### SPLEX ENV  ###
export SP_SYS_PRODDIR=/splex/prod
export SP_SYS_VARDIR=/splex/var
export SP_SYS_BINDIR=/splex/prod/bin
export SP_SYS_HOST_NAME=source
export SP_COP_TPORT=2100
export SP_COP_UPORT=2100

### Alias ###
alias spbin='cd /splex/prod/bin'
alias spvar='cd /splex/var'
alias splog='cd /splex/var/log'

$ . .bash_profile
Target :
$ su - splex

$ vi .bash_profile
### Oracle ENV  ###
export ORACLE_HOSTNAME=target
export ORACLE_BASE=/oracle
export ORACLE_HOME=$ORACLE_BASE/19cSE/db
export ORACLE_SID=sgdb19c

### SPLEX ENV  ###
export SP_SYS_PRODDIR=/splex/prod
export SP_SYS_VARDIR=/splex/var
export SP_SYS_BINDIR=/splex/prod/bin
export SP_SYS_HOST_NAME=target
export SP_COP_TPORT=2100
export SP_COP_UPORT=2100

### Alias ###
alias spbin='cd /splex/prod/bin'
alias spvar='cd /splex/var'
alias splog='cd /splex/var/log'

$ . .bash_profile
2-6. oratab 확인(Source/Target)
$ cat /etc/oratabSource :

Target :

2-7. hosts 파일 수정(Source와 Target 네트워크 확인 : port 오픈, tcp 통신)
$ su - root
$ vi /etc/hosts
Source :

Target :

2-8. ping 확인
Source :

Target :

2-9. 포트 오픈 확인
Source :
$ nc -l 2100 --> 타겟 서버에서 입력하는 텍스트를 대기함Target :
$ nc 172.16.60.195 2100  --> Source 서버주소와 2100번 포트
  test --> 아무 텍스트나 입력 후 엔터 후 ctrl+c 하여 연결 종료
Source :
$ test --> target에서 입력한 "test"를 확인 함.
2-10. TBS 생성(Source/Target)
$ su - oracle
$ sqlplus / as sysdba

SQL> startup
SQL> desc dba_data_files;
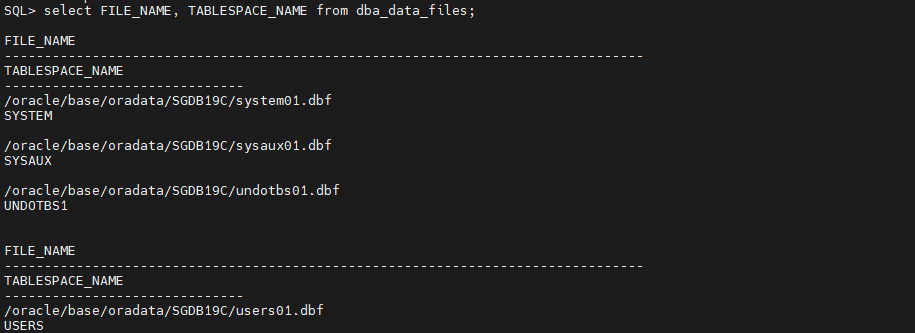
SQL> select FILE_NAME, TABLESPACE_NAME from dba_data_files;
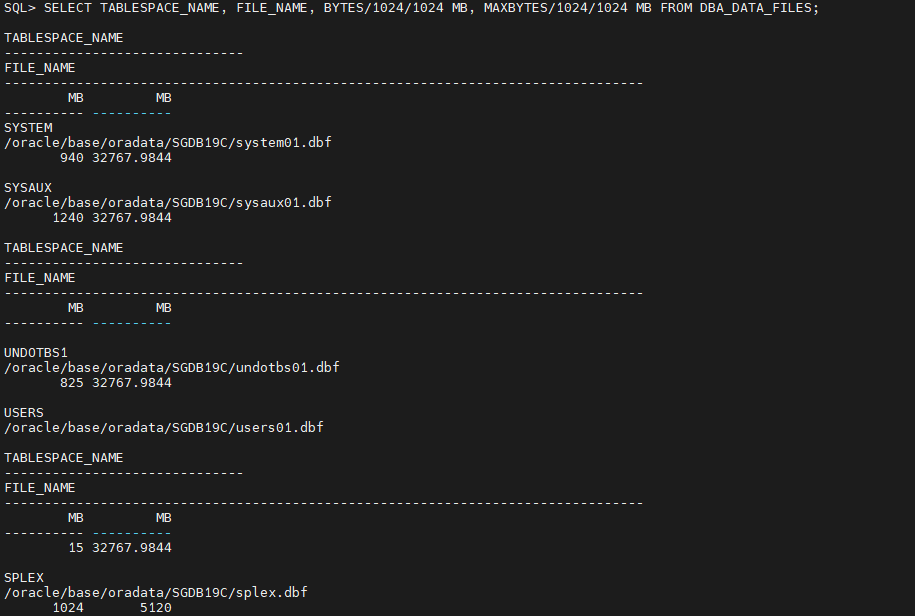
SQL> create tablespace splex datafile '/oracle/base/oradata/SGDB19C/splex.dbf' size 1g autoextend on maxsize 5g;
SQL> SELECT TABLESPACE_NAME, FILE_NAME, BYTES/1024/1024 MB, MAXBYTES/1024/1024 MB FROM DBA_DATA_FILES;
2-11. db 유저 생성(Source/Target)
SQL> CREATE USER SPLEX IDENTIFIED BY splex DEFAULT TABLESPACE SPLEX;
SQL> GRANT DBA TO SPLEX;
SQL> GRANT SELECT ON SYS.USER$ TO SPLEX;
2-12. job/fk/trigger 비활성화(Target)
--> job, fk, trigger 가 있다면 비활성화
SQL> alter system set job_queue_processes = 0 scope=both;
SQL> FK disable
SQL> trigger disable
2-13. supplemental logging 설정
SQL> SELECT supplemental_log_data_min MIN,
supplemental_log_data_pk PK,
supplemental_log_data_ui UI,
supplemental_log_data_fk FK,
supplemental_log_data_all "ALL"
FROM v$database;
alter database add supplemental log data ;
alter database add supplemental log data (primary key) columns;
alter database add supplemental log data (unique) columns;
ALTER DATABASE ADD SUPPLEMENTAL LOG DATA (FOREIGN KEY) COLUMNS;

SQL> alter database add supplemental log data (primary key, unique) columns;
--> 상황에 맞게 Level 설정

SQL> SELECT supplemental_log_data_min MIN,
supplemental_log_data_pk PK,
supplemental_log_data_ui UI,
supplemental_log_data_fk FK,
supplemental_log_data_all "ALL"
FROM v$database;
2-14. Archive log 확인
SQL> archive log list
3. SharePlex Install
3-1. SharePlex 미디어 업로드

3-2. splex 유저에게 업로드한 미디어 실행 권한 부여(Source/Target)
$ su - root
$ chown splex:dba SharePlex-11.0.0-bl-rhel-amd64-m64.tpm
$ chmod 755 SharePlex-10.1.3-b46-rhel-amd64-m64.tpm
$ ls -altr
3-3. 인스톨 진행(Source/Target)
su - splex
$ ./SharePlex-10.1.3-b46-rhel-amd64-m64.tpm
Unpacking ..................................................................
..........................................................................
..........................................................................
..........................................................................
..........................................................................
..........................................................................
..........................................................................
..........................................................................
..........................................................................
..........................................................................
..........................................................................
..........................................................................
..........................................................................
...............................
SharePlex installation program:
SharePlex Version: 11.0.0
Build platform: rhel-amd64
Target platform: lin-amd64
Please enter the product directory location? /splex/prod
Please enter the variable data directory location? /splex/var
Please specify the SharePlex Admin group (select a number):
1. [dba]
? 1
Please enter the TCP/IP port number for SharePlex communications? [2100]
Preparing to install SharePlex v.11.0.0:
User: splex
Admin Group: dba
Product Directory: /splex/prod
Variable Data Directory: /splex/var
Proceed with installation? [yes]
Installing ................................................................
.........................................................................
.........................................................................
.........................................................................
.........................................................................
.........................................................................
.........................................................................
.........................................................................
.........................................................................
.........................................................................
.........................................................................
.........................................................................
.........................................................................
.........................................................................
.........................................................................
.........................................................................
...................................
Setting file ownerships ...................................................
.........................................................................
.........................................................................
.........................................................................
.........................................................................
.........................................................................
.........................................................................
.........................................................................
.........................................................................
.........................................................................
.........................................................................
.........................................................................
.........................................................................
.........................................................................
.........................................................................
.........................................................................
................................................
Setting file permissions ..................................................
.........................................................................
.........................................................................
.........................................................................
.........................................................................
.........................................................................
.........................................................................
.........................................................................
.........................................................................
.........................................................................
.........................................................................
.........................................................................
.........................................................................
.........................................................................
.........................................................................
.........................................................................
.................................................
Do you have a valid SharePlex v. 11.0.0 license? [yes]
Please specify the platform for license key (select a number):
1. [Oracle]
2. File
3. JMS
4. Kafka
5. SQL Server
6. Postgres
7. MySQL
8. Snowflake
9. Event Hubs
10. All Platforms
? 10
Please enter the License key? XXXXXXXXXXXXXXXXXXXXXXXXXXXXXXXXXXXXXXXXXXXXXXXXXXXXXXXXXXXXXXXXXXXXXXXXXXXXXXXXXXXXXXXXXXXXXXXXXXXXXXXXXXXXXXXXXXXX
SharePlex v. 11.0.0 license validation successful.
Following are the details of installed licenses:
Platform: All
Product Name: SharePlex
Product Version: 11
License Number: 152-882-869
License Key Type: Trial
License Expiry: Midnight of Jan 29, 2024
License Key: XXXXXXXXXXXXXXXXXXXXXXXXXXXXXXXXXXXXXXXXXXXXXXXXXXXXXXXXXXXXXXXXXXXXXXXXXXXXXXXXXXXXXXXXXXXXXXXXXXXXXXXXXXXXXXXXXXXXXXXXX
NOTE: You can upgrade this license key or add license keys by executing utility
/splex/prod/install/splex_add_key.
Installation log saved to: /home/splex/.shareplex/INSTALL-SharePlex-11.0.0-2312081345.log
SharePlex v.11.0.0 installation successful.
3-4. ora_setup 수행(Source/Target)
$ cd $SP_SYS_PRODDIR
$ spbin
$ $ ./ora_setup
Welcome to the Oracle SharePlex setup process for port 2100.
This process creates tables and user accounts needed to run
Oracle SharePlex replication.
Will the SharePlex install be using a BEQUEATH connection?(Entering 'n' implies a SQL*net connection) [y] :
Please note the following:
** In response to prompts, a carriage return will choose the default
given in brackets. If there is no default, a reply must be entered.
** To exit the program while the program is waiting for input, use the
CTRL-C key sequence.
This sequences can be entered by holding down the CONTROL key and
pressing the C key.
Enter the Oracle SID for which SharePlex should be installed [sgdb19c] :
In order to create the SharePlex tables and user account, we must
connect to the database as a DBA user
Enter a DBA user for sgdb19c : splex
Enter password for the DBA account, which will not echo :
connecting--This may take a few seconds.
validating user name and password. . . This may take a few seconds.
SharePlex objects will need to be created under a special
account. You can pick an existing user or create a new one.
Would you like to create a new SharePlex user ? [y] : n
Enter username of an existing user : splex
Enter user password for splex :
validating user name and password. . . This may take a few seconds.
Warning: This user is now being granted unlimited tablespace.
This privilege will remain in effect until it is explicitly changed.
select on sys.user$ already exists for user splex ... continuing setup.
Do you want to enable replication of tables with TDE? [n] : n
To enable replication of tables with TDE in the future, please rerun ora_setup.
Setup will now install SharePlex objects.
These are the existing tablespaces.
SYSTEM SYSAUX UNDOTBS1 TEMP USERS SPLEX
Enter the default tablespace for use by SharePlex [SPLEX] :
Enter the temporary tablespace for use by SharePlex [TEMP] :
Enter the index tablespace for use by SharePlex [ ] : SPLEX
The current index tablespace for user splex is TOOLS.
Do you want to change to SPLEX? [y] :
Creating SharePlex objects [Installation type: Fresh]. . .
Creating SharePlex Oracle-timezone-region map . . . Done.
Creating Conflict Resolution Package . . . Done.
Creating SharePlex Dataequator package . . .
Loading Compare Package from "/splex/prod/util/sp_deq_pkg.plb"...Done.
Loading Compare Varray Package from "/splex/prod/util/sp_deq_v_pkg.plb"...Done.
Will the current setup for sid: [sgdb19c] be used as source (including cases as source for failover or master-master setups)? [y] :
Setup of SharePlex objects successful . . .
Changing SharePlex connection database . . .
Setup of sgdb19c completed successfully
-- The datasource identifier in the SharePlex configuration is 'o.sgdb19c' --
3-5. 기동 스크립트 생성(Source/Target)
$ cd $SP_SYS_BINDIR
$ vi start.sh
./sp_cop -u2100 &
$ chmod u+x start.sh
3-6. config 파일 생성 및 수정(Source)
$ cd $SP_SYS_VARDIR/config
$ ls
ORA_config

$ cp ORA_config cfg_01
$ vi cfg_01
Source에서 splex 유저의 emp 테이블을 Target에 있는 splex 유저의 emp 테이블로 config 파일을 구성했다. routing map에는 "Source의 hostname:E01*Target의 hostname:P01@o.SID의 이름" 으로 구성한다.
3-7. 테이블 생성(Source/Target)
$ su - oracle
$ sqlplus / as sysdba
SQL> conn splex
SQL> CREATE TABLE emp
(
    empno       NUMBER(4)       NOT NULL,
    ename       VARCHAR2(10),
    job         VARCHAR2(9),
    mgr         NUMBER(4),
    hiredate    DATE,
    sal         NUMBER(7,2),
    comm        NUMBER(7,2),
    deptno      NUMBER(2)
);
3-7. config 확인(Source)
$ spbin
$ ./start.sh

$ ./sp_ctrl
sp_ctrl> verify config cfg_01
3-8. Activate config(Source)
sp_ctrl> activate config cfg_01
3-9. Activate 확인
Source :
sp_ctrl> show config
sp_ctrl> show --> 프로세스 기동 확인(Capture, Read, Export)
Target :
sp_ctrl> show --> 프로세스 기동 확인(Import, Post)
DML 테스트 수행
Source :
$ su - oracle
$ sqlplus / as sysdba

SQL> conn splex
SQL> INSERT INTO emp VALUES(7839, 'KING', 'PRESIDENT', NULL, TO_DATE('1981-11-17', 'yyyy-mm-dd'), 5000, NULL, 10);
SQL> INSERT INTO emp VALUES(7698, 'BLAKE', 'MANAGER', 7839, TO_DATE('1981-05-01', 'yyyy-mm-dd'), 2850, NULL, 30);
SQL> INSERT INTO emp VALUES(7782, 'CLARK', 'MANAGER', 7839, TO_DATE('1981-06-09', 'yyyy-mm-dd'), 2450, NULL, 10);
SQL> INSERT INTO emp VALUES(7566, 'JONES', 'MANAGER', 7839, TO_DATE('1981-04-02', 'yyyy-mm-dd'), 2975, NULL, 20);
SQL> select * from emp;
Target :
$ su - oracle
$ sqlplus / as sysdba

SQL> conn splex
SQL> select * from emp;
'SharePlex' 카테고리의 다른 글
| [SharePlex] Parameter 정리 (0) | 2024.05.02 |
|---|---|
| [SharePlex] ORA-650, ORA-01031 (0) | 2024.05.02 |
| [SharePlex] Datapump를 활용한 초기적재 (1) | 2024.02.27 |
| [SharePlex] EDB16 to EDB16 (1) | 2024.01.10 |
| [SharePlex] SharePlex Migration (0) | 2023.12.07 |